Posts

Showing posts from 2011

Started once again ....

Image
With some spare time in the holidays, I have resumed the build ....  First thing i did was make some room for the buttons in my flawed CP layout, now there is some room for the buttons to sit. I also need to router the CP top from behind to give it enough throw distance.  I then cut fixed two battens to the sides of the inner monitor panel, and a large sheet of MDF across them.  I then measured the size of the TV screen I am going to use and used that as a template to mark the centre.  I cut the hole I marked out with a jigsaw and planed it to get any bumps out. I then fixed it to the battens Next step is going to fix the flexible ply to around the bends 
Image
Rebated the inner shelf sides for the plywood to fit nicely  More rebating .... Today started the CP box. Sorted the width of the digital photo frames This is how it will sit  CP box sitting on the main cabinet. (my custom MAME cabinet in the backgroung needing its new display to be installed) 

Progress ....

Image
Marked out the side panels after getting some more MDF.  Rough Plans  Cut out, Slight backward tilt, and used a flush bit on the router to make a duplicate.  Made a bloody mess!! MDF dust gets everywhere! Temporarily attached side panels to bottom cabinet.   Packing up at the end of the day is a bit of a pain because of a lack of a fixed workspace.  Fixed the CP bottom tray to the bottom cabinet Created a top section to mount the tv, and also bought some 3mm Plywood to bend around the front. 

it has BEGUN .....

Image
The build has finally begun! I have been really busy with school so there hasn't been much progress as of late. But school holidays started today and I bought my 2 pieces of 2400x1200x18 MDF. Got home and started cutting!  Step 1: Build the bottom cabinet  FIRST CUT! Using my sketchup model, I had the dimensions to start. I went with a 1050mm x 650mm base cabinet, as this would give me a good height and a width that would minimise the side bezel of the tv.  Rough plans I drew up ...  Tomorrows Job - Start the Side panels and top tray, including the CP bench.  Also going to need some more MDF, so a trip to Bunnings as well. 

Design Choices ....

Image
So I have been drafting in SketchUp, this is what I have so far ......  Still need to do the bevels and the buttons on the side of the CP. 

weird ....

Image
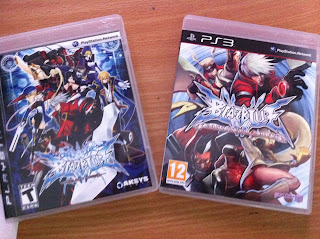
I ordered BlazBlue: Calamity Trigger, BlazBlue: Continuum Shift and Marvel Vs Capcom 3 all in the same order, but only both BlazBlue's came .... burn.  Well here they are, and may I just say, crazy ass game! I really need to get this thing built, playing on your own is boring as hell!

The Bad comes with the Good ...

Image
So bad news first, Semitsu buttons are going to take another 7 days longer roughly while the place I ordered them gets more stock, so more waiting ....  Still waiting for MvC3 and both BlazBlue's ... hmmmmmmm  Good news, my Kaiser Baas Digital photo frames came in and they are super thin and exactly what I wanted. 1 minor thing that bugs me (and might affect the final design) is that the image colours are distorted if the frames are sitting flat in front of the player controls. It needs to be tilted toward the player slightly for the colours to look good... so I don't know what I may have to do there yet.  The 8" LED digital frames displaying Akuma and Blanka's SSF4 Movelists. 

Little update:

Just placed an order with  http://in2amusements.com.au/  for the player 2 controls. This is just the same order placed previously, but without the single wire (as I have my own now).  Hopefully the bank deposit clears tonight for the digital photo frames, and I can get them in soon.  Next step, a structured drawing of the cabinet and pieces, and get a metal base made up.

more progress ....

Image
Found the perfect digital photo frames for the control panel:  Kaiser Baas 8" Ultra-Slim Digital Photo Frame (KBA04035) Has no branding on the front, touch navigation buttons on the front also, a nice big LED backlit 8" screen, and at a great price. Ordered them from  http://www.itsdirect.com.au/  which are based in QLD so they should arrive in a few days max.  Also ordered MvC3, Blazblue: Continuum Shift and Blazblue: Calamity Trigger which SHOULD come by the end of the week (hopefully).

Ok ... so some progress has been made ....

Image
This is happening ....  Ok, so the parts I ordered arrived after only a few days, and I fiddled with them, connecting the joystick and a few buttons and testing them on the PS3 and 360, and it worked for both consoles which is awesome. Gotta love my PS360 PCB.  I then entered phase 2 of my testing of the controls, and got a piece of pine from school, spaced out the buttons and then cut a few holes in it in my free period. I then came home and screwed all the buttons in, and a hack job wiring it all up which was functional, but not very pretty.  Loving my Semitsu buttons, so pretty, and the Joystick is super responsive, pulling off Hadoukens like nobody's business! My copy of SSF4 also arrived from  http://www.ozgameshop.com/  which only took about a week, which is awesome. I went to order MvC3 but they were out of stock, bummer.    Saturday came and I went to look for a TV to put in my cabinet. Went to Dick Smith and found the perfect...

Purchase Made:

Made the first purchase of the vewlix cabinet today from  https://in2amusements.com.au/   Purchase included pretty much a 1 player control setup:  PS360 PCB  Options:  USB Cable  Seimitsu PS-14-KN 30mm Clear Pushbuttons Single Wire with .110 Quick Connector  Options:  Wire Colour : Black Sanwa JLF-TP-8YT Joystick  Options:  Sanwa Ball Top : Black Sanwa JLF-H harness I opted for the 1 player control so i can wire it up on a smaller box test it out and see how the PCB goes while I wait for some more cash to buy the 40" tv.  Speaking of the 40". I dunno ......  i was sitting fairly close to my current 40" tv with SF4 going and the CP is going to have to come out quite a bit for the player to see the whole screen. i'll do some more testing before I make the final TV purchase, but the TV is going to have to be next to buy, because that will determine the size of the entire cabinet build.  I also opted for the Cl...

Slow News Day .....

Image
So nothing really to add today, other than I have compiled a list of the various games that I will need to complete my collection:  Have:  Tekken 6 (PS3) Tekken 5: Dark Resurrection (PS3) Street Fighter 4 (360) Super Street Fighter 4 (Ordered for PS3) - Should be arriving in a few days.  Need:  Marvel vs Capcom 3 BlazBlue: Calamity Trigger BlazBlue: Continuum Shift Soul Caliber 4 Super Street Fighter 2: Turbo - HD Remix Mortal Kombat vs DC Universe King of Fighters XII 

Some Good News ......

Image
Hopefully the build can get started sooner rather than later, as a mate at work has some MDF that I can use with all the tools and expertise that I need (Which is AWESOME). Also changed the design slightly to something more similar to the "BEWLIX" machine from B15SDM Designs. Been looking at vewlix machines for some time now and this cabinet is by far head and shoulders above the rest, which is why I have chosen to emulate it (roughly) within my design.  The website is: http://www.b15sdmdesigns.com/    I like the look of the black and white, don't enjoy the green and purple accents though. And the speakers on this machine stand out too much, I think I am going to have a single or double speaker strip running horizontal. I do like the idea of the secondary screen at the top, displaying info (i think it is just a digital photo frame). However I would like to incorporate it into the machine maybe below the main monitor or in the control panel, displaying move list...

This is going to be expensive ....

Using :  http://www.in2amusements.com.au/   So I have figured out the approximate cost THE CONTROL PANEL: 22 x Semitsu or Sanwa Buttons (havent decided yet) - $64.90 2 x Sanwa JLF Joysticks - $55.90 2 x PS360 PCB's - $119.90 Ground Harness - $9.95 2 x JLF Wiring Harness - $7.90 2 x (4 Set) PCB Feet - $3.90 2x USB Cables (with PS360) - $8.00 Flourescent Light ~ $30 - $50 Cost for just the control panel, ~ $340 (minus the plexi, as I have no idea what that stuff costs) ... Ouch

Ok, So I have a made a decision ......

Image
After my last build, my MAME Cabinet (which still needs a lot of work) I was left wanting. Although it could play all the old games that I loved as a kid (DD2: The Revenge), I was left disappointed on how it performs with the newer games. This led to my decision .... to build a Vewlix clone machine, to house both my PS3 and 360. Although a much more difficult build (and more expensive) I thought it would be a good next challenge.  An example of something similar I would be going for is below. Next step:  a comprehensive parts list.